Summary
You can connect Safe Pathways to Planning Center by creating Personal Access Tokens in Planning Center and entering them in the Safe Pathways Integrations settings. Once connected, Safe Pathways can communicate with your Planning Center account and import eligible people based on your selected minimum age.
Who this is for
-
Church Administrators
-
Account Owners
-
Anyone with access to Settings in Safe Pathways and the correct permissions in Planning Center
What you’ll need
Before you begin, make sure you have:
-
A Planning Center account
-
Access to the Planning Center developer/app page
-
Access to Settings in Safe Pathways
Before you start
Safe Pathways connects to Planning Center using Personal Access Tokens. During setup, you will generate a Client ID and Secret in Planning Center, then paste those values into Safe Pathways.
Steps to connect Planning Center to Safe Pathways
1. Create or sign in to your Planning Center account
If you do not already have a Planning Center account, create one first.
2. Open the Planning Center API applications page:
https://api.planningcenteronline.com/oauth/applications
3. Open Personal Access Tokens
In the left-side menu, select Personal Access Tokens. It will look something like this:
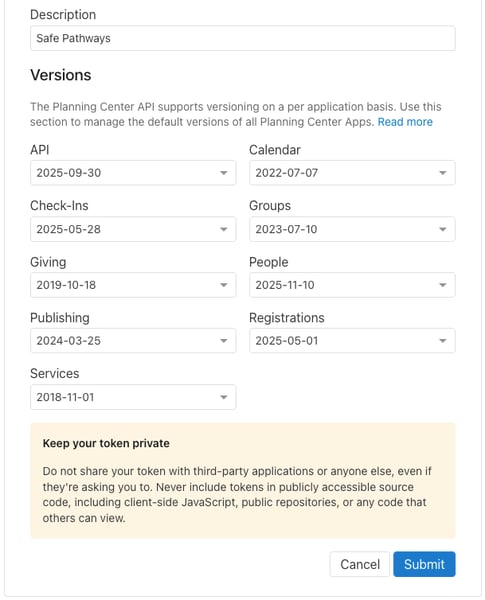
4. Create a new token
On the Personal Access Tokens page:
-
Enter a Description (We recommend using: Safe Pathways)
Once created, Planning Center will generate:
-
Client ID
-
Secret
5. Copy the Client ID and Secret
Once you click "Submit", Planning Center will generate a Client ID and a Secret.
Copy both values from Planning Center -- You will need to enter these into Safe Pathways.
6. Open Safe Pathways Settings
In Safe Pathways:
-
Go to Settings
-
Open the Integrations tab
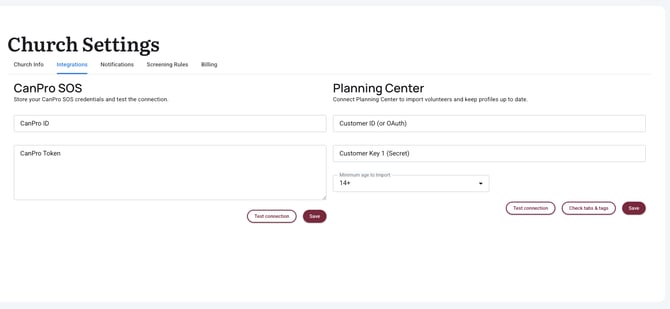
7. Enter your Planning Center credentials
Paste the following into the appropriate fields:
-
Client ID
-
Secret
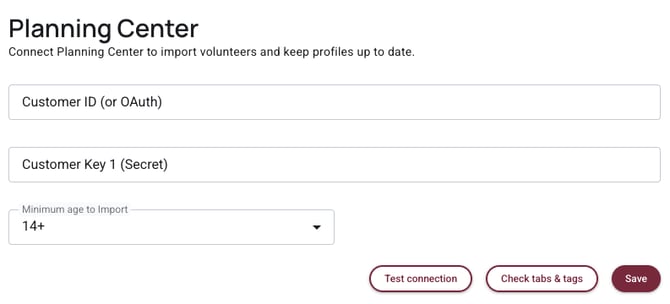
8. Select the minimum age to import
Choose the minimum age for the records you want Safe Pathways to import from Planning Center.
9. Test the connection
Click Test Connection.
If the connection is successful, continue to the next step.
10. Check Tabs & Tags
Click Check Tabs & Tags.
This generates the required codes within Planning Center for the integration to work properly.
11. Save your settings
Click Save to complete the integration setup.
What happens next
Once the integration is saved successfully, Safe Pathways will be able to communicate with Planning Center and use the integration settings you configured.
Depending on your Safe Pathways setup, you may then be able to import people who meet the minimum age requirement.
Troubleshooting
Test Connection does not pass
If Test Connection fails:
-
Make sure the Client ID and Secret were copied correctly
-
Confirm the token was created in the correct Planning Center account
-
Try generating a new Personal Access Token and entering the new credentials again
Check Tabs & Tags does not work
If Check Tabs & Tags does not complete successfully:
-
Confirm the connection test passed first
-
Make sure your Planning Center account has the necessary permissions
-
Save only after all required steps are completed successfully
Import option is missing
The Import button may not yet appear in the current layout.
At the time of writing, the developer noted that the Import button is missing from the new layout and will be added to the bottom of the Integrations tab on the Settings page.
Notes
-
The Planning Center connection uses Personal Access Tokens
-
The Description field in Planning Center can be named something simple, such as Safe Pathways
-
Be sure to save your settings after the connection test and tab/tag check are complete
Last reviewed
February 26, 2026