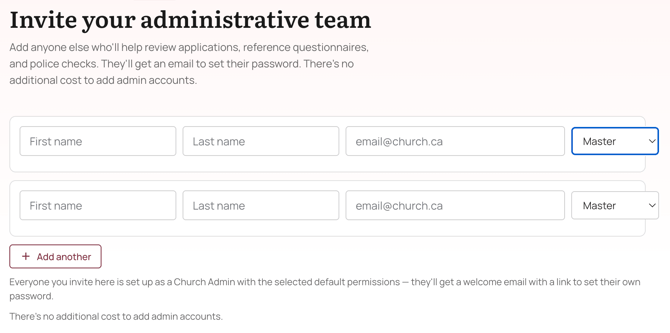
On Step 2 of 10, Admin team, invite co-admins to help manage your Safe Pathways account. Choose each invitee's permission level (Master, L1, or L2), then click Save & continue. This step is optional, you can skip it and add admins later.
Who should be on your admin team?
Most churches add two to five administrators. Common roles include:
- Safeguarding lead, the person who owns the program day-to-day
- Executive pastor or office administrator, for oversight and approvals
- Ministry directors, kids, youth, or pastoral care leads who manage their own volunteer teams
- Volunteer coordinator, handles recruitment and onboarding paperwork
You can add or remove admins at any time, so don't overthink the initial list, start with the people you know need access now.
There's no extra fee to add admin accounts. Invite as many co-admins as your church needs to share the safeguarding load.
Inviting an admin
The Admin team step shows two empty invite rows by default. Each row collects everything we need to send a welcome email and set the new admin's permissions.
- Enter the invitee's first name and last name This is how their name appears across Safe Pathways, in audit records, on shared dashboards, and in the email signature of any communications they send through the app.
- Enter their email address Use the email they actively check. This is where the welcome email and all future system emails will go.
- Choose their permission level From the dropdown on the right, pick Master,L1, orL2. Master is the default. See Comparing clearance levels below for what each one allows.
- Click + Add another for more invitees A new blank row appears. You can add as many admins as you need before saving.
- Remove a row if needed Click the × on the right side of any row to remove it before saving.
- Click Save & continue Each invitee receives a welcome email with a link to set their own password and sign in. The onboarding flow then advances to Step 3.